1. Prepare IoT Hub and Device for this example 1.1. Developer PC - Generate Device self-signed certificates [MUST] Please follow up tutorial-x509-self-sign At last stage, you need to run the following command for making .pem file: openssl x509 -in prov_device1.crt -out prov_device1.pem -outform PEM For your reference, prepare example log as below: Notice! device ID = "W5100S_EVB_PICO_PROV_X509" ..

인증서 업데이트 방법 먼저 공유기의 80 포트를 웹서버로 포트포워딩 설정을 한다. (물론 real IP를 가진 서버라면 따로 공유기 세팅을 할 필요는 없다.) 열려진 80포트로 스크립트가 자동으로 어떤 파일들을 가져오고 연결확인하고 하기 때문에 꼭 필요한다. 아래 작업이 완료된 후에는 필요없다면 이 포트포워딩 룰을 제거하면 된다. 아래 명령어를 수행하면 된다. cd /etc/letsencrypt 수행 후에 아래 내용을 참고해서 수행한다. sudo certbot -v renew s01:/etc/letsencrypt$ sudo certbot -v renew Saving debug log to /var/log/letsencrypt/letsencrypt.log - - - - - - - - - - - - - - ..

1. Prepare IoT Hub and Device for this example 1.1. Developer PC - Generate Device self-signed certificates [MUST] Please follow up tutorial-x509-self-sign For your reference, prepare example log as below: Notice! device ID = "W5100S_EVB_PICO_X509" MINGW64 ~ $ mkdir certi MINGW64 ~ $ cd certi/ MINGW64 ~/certi $ openssl genpkey -out device1.key -algorithm RSA -pkeyopt rsa_keygen_bits:2048 .........

1. Prepare IoT Hub and Device for this example 1.1. Azure portal [MUST] Same as 1.1. Azure portal in _1_APP_TELEMETRY_manual.md 1.2. Developer PC 1.2.1. SDK setting In the following pico-azure-iot-sdk-c/application/main.c source file, find the line similar to this and replace it as you want: (...) // The application you wish to use should be uncommented // //#define APP_TELEMETRY #define APP_C2D..

1. Prepare IoT Hub and Device for this example 1.1. Azure portal In Azure portal, you need to create a device and get the connection string informations as below: This example uses symmetric key You copy the key string,"Primary Connection String" and paste the string into your code as decribed in next section. 1.2. Developer PC 1.2.1. SDK setting In the following pico-azure-iot-sdk-c/application..

1. 🎯 Azure-IoT-SDK AppDescription Azure IoT SDK example Basic Azure cloud functions with Azure IoT SDK. (NonOS + WIZnet W5100S) 1.1. 3rd party SDKs Azure IoT C SDKs and Libraries Mbed TLS WIZnet ioLibrary for CMake users => https://github.com/Wiznet/RP2040-HAT-C/tree/main/libraries/ioLibrary_Driver 2. 🎓 Getting started See Getting Started with the Raspberry Pi Pico and the README in the pico-sdk..

W5500 Driver open source projects - 오픈소스이전에 PSoC W5500 Driver 에 관련된 글을 작성했었다. W5500 Ethernet driver for PSoC - FreeRTOS이외에 많은 대중적인 MCU 들이 많이 있는데 관련해서 드라이버 소스들을 정리해 보고자 한다.일단, 공식적으로 WIZnet에서 제공하고 있는 통합 라이브러리는 아래와 같다. https://github.com/Wiznet/ioLibrary_Driver ; SOCKET APIs like BSD & WIZCHIP(W5500 / W5300 / W5200 / W5100) Driver AVR - ATmel- 일단 아두이노 소스를 모두 활용할 수 있다.Arduino Ethernet Github sitehtt..

미니 W5500 보드 작게 만든 만큼 정성이 있어 보이는 보드들.자료는 아래 위키페이지를 통해 살펴볼 수 있습니다.http://www.microduino.cc/wiki/index.php?title=Microduino-W5500물론, duino를 붙인 만큼 소프트웨어는 아두이노와 함께 사용할 수 있다는 장점을 가지고 있습니다.Arduino libraries and support packages:https://github.com/Microduino/Microduino_Tutorials/tree/master/Microduino_Libraries/_02_Microduino_Ethernet_WIZ하드웨어 자료도 공개소프트웨어로 오픈하고 있습니다.Eagle PCB File:Microduino-W5500.zip세상은..

이미 스크랩 해놓은 것 부터 그냥 정리해 두자. (업데이트를 기대하며..) 먼저 유명한, http://xively.com 개발 키트 (via Xively Jumpstart Kit, ARM® mbed Edition - Xively)영어권은 좋겠다..저들끼리 잘허네~~무튼 요는 간단히 킷을 사서 뚝딱 하면 간단 IoT 완성데이터는 http://xively.com 에서 이쁘게 관리해 주고멀 관리할 것인지만 꾸며 넣으면 됨..이런 세상이야~~관련 ARM techcon review 하나 추가 별로 안 유명하지만 먼가 있어 보인다. http://exosite.com 개발 키트몇개 더 있다. 자세한 정보는 여기 -> http://exosite.com/solutions/development-kits/ (via TI L..
여기저기 클라우드 서비스가 생겨나고 있다.Internet of Things device 를 위한 서비스들도 많이 나오고 있네.대표적인 것은 물론, http://xively.com
아두이노 + WIZ550io (made by WIZnet) 모듈을 이용하여 다양한 Internet of Things 예제들을 코드 구현 및 데모를 실은 동영상이다. 관련된 소스코드는 Github을 통해서 공유하고 있다.https://github.com/MD4N1/Wiz550io-Tutorial-Series 예제들을 보니 왠만한 프로젝트는 다 있다. 예제 소스가 있는 폴더를 스크린샷해서 가져왔다. 요즘 유행하는 것들은 다 있네.Twitter, Thingspeak, Web Server, Xively ...각각 하나하나가 가치 있는 프로젝트들인데 #Internet of Things 에 관심이 있는 사람들이면 한번씩들 들어봤을 이름들..한번씩 받아서 돌려보기만 해도 큰 공부가 될 듯 하다. medium.com ..

Global 이든 Link-local 이든 Unicast 주소를 인터페이스에 하나씩 할당 할 때 마다, 아래와 같은 "Solicited-Node Multicast Address"가 하나씩 있어야 한다. (또는 처리할 수 있어야 한다.) 아래 주소로 패킷이 들어왔는데, 처리하지 않으면 이상하겠지. 스펙상 의도하여 생성하지 않았지만 각 unicast 주소에 저절로 맵핑되어야 하는 것이므로 추가) 당연히 all nodes multicast 주소인 "FF02::1"과 로컬주소 "::1" 도 처리해 주어야 겠지 =) 출처 : How IPv6 Works: IPv6 Mapping Unicast IPv6 Addresses to Solicited Node IPv6 AddressesFor example, for the n..
참 오래된 기술이다.이런걸 정리해 놓은 게 있으려나..........있지.간단히 국산블로그에서도리눅스에 PPPoE 서버 구축하기 해외 블로그 에서도http://www.howtodoityourself.org/pppoe-server-how-to-do-it-yourself.html 간단히 옮겨보자꾸나. 1. Make sure you have an active internet connection. If not, set it up by using your favorite text editor (I use vim):vim /etc/network/interfaces auto lo iface lo inet loopback iface eth0 inet static address 89.xxx.yyy.zzz #Your pu..

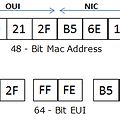
(원본글 https://supportforums.cisco.com/document/100566/understanding-ipv6-eui-64-bit-address) MAC 어드레스로 Interface-ID를 생성해 내는 방식에 관한 것이다.약간 변경된 것이 있다는 책의 내용을 보고 웹 서칭..만드는 방법은 아래 그림과 같다. 문제는 맨 왼쪽 바이트의 2번째 비트이다.이 비트가 로컬이냐 글로벌(?)이냐를 나타내는 비트.이전 EUI-64의 경우 '1'이 로컬, '0'이 글로벌(영어로 univeral이네 ^^)이었는데,Modified EUI-64에서는 이를 뒤집었다고.The reason for inverting can be found in RFC4291 section 2.5.1. 일단, 우리는 최신껏만 기억하..

Realtek PHY chip - 데이터시트자주 찾는데, 보관용으로 하나 포스팅 MDC/MDIO 파형을 볼려구 했는데, 일단 그림도 캡쳐해 두고파형을 보면 간단한 동작은 간단히 구현 가능~~ 겸사겸사 간단한 설명도 스크랩 RTL8201BL Single-Port 10/100M Fast Ethernet PHYceiver General DescriptionThe RTL8201BL is a single-port PHYceiver with an MII (Media Independent Interface). It implements all 10/100M Ethernet Physical-layer functions including the Physical Coding Sublayer (PCS), Physical Me..

